In this comprehensive tutorial, you will acquire the expertise to construct a PHP-based contact form enriched with essential functionalities such as form validation, seamless email transmission, and an effective honeypot mechanism, among other features.
Understanding the Role of PHP Contact Forms in Website Interactions
PHP Contact forms serve as a crucial communication bridge between website owners and their visitors. These interactive forms – typically composed of name, email, subject, and message input areas – allow visitors to send messages directly to the website host. Visitors simply fill out the various fields and click a button to transmit their message. PHP (Hypertext Preprocessor) facilitates this process by validating the form data and relaying the entered message to a predetermined email address.
The Threat of Spambots to PHP Contact Forms
Despite their crucial role in enhancing website interaction, PHP contact forms are often targeted by unwanted spam activities. These activities are automated by spambots – software designed to infiltrate contact forms and deliver unsolicited messages. These messages, often laden with advertisements, phishing attempts, and malware, pose a significant threat to website security and integrity.
Ensuring Your PHP Contact Form is Spam-Free: The Role of Captcha and Honeypot
There are various mechanisms to safeguard PHP contact forms from spam activities. One common method is the use of a captcha or a Completely Automated Public Turing test to tell Computers and Humans Apart; this is a test that the system administers to determine whether the user is human or not. Implementing a captcha can be an effective barrier against spambots; however, it is not always user-friendly. Captchas often appear as jumbled, distorted text that frustrates legitimate users who struggle to decipher them.
Fortunately, an alternative solution exists in the form of a ‘honeypot’. This nifty programming strategy uses a hidden field on your contact form to trick spambots. The hidden field, or ‘honeypot’, is visible to spambots but not to human users. If the honeypot field is filled – indicating the presence of a spambot – the PHP can then be configured to ignore the subsequent form submission, thus ensuring your contact form remains spam-free.
Here are a few key points to remember:
- Contact forms facilitate direct communication between website owners and their visitors;
- Spambots pose a significant threat to website security through spam activities;
- Protect your PHP contact form with captcha or honeypot to block spam entries;
- Captcha can be difficult for users to interpret, leading to a subpar user experience;
- Honeypots offer an alternative spam prevention method that doesn’t compromise user experience.
How to Create an Effective Honeypot to Outsmart Spambots
Harnessing the power of PHP, you can configure an efficient honypot that will shield your contact forms, but how exactly does this process work? The creation of an effective honeypot entails applying CSS classes that are invisible to the human users but visible to spambots.
In the style.css, a particular CSS class is created to obscure the honeypot field:
.invisible-to-user {

    display:none

}
This CSS class effectively hides the honeypot field from human users without deterring spambots.
Within the form, an inclusion of a disguised honeypot field is made:
<label for="website" aria-hidden="true" class="invisible-to-user"> Website

    <input type="text"

           name="website"

           id="website"

           class="invisible-to-user"

           autocomplete="off"

           tabindex="-1">

</label>
It’s crucial here to note that the honeypot’s naming should appear legitimate to effectively lure in spambots. As spambot technology advances, these automated softwares become smarter in detection. The honeypot method, thus, must evolve too, to maintain its effectiveness against these advanced spambots.
Here, implementing a dynamic honeypot proves beneficial. This dynamic honeypot changes its name for each request and is relocated randomly throughout the form. Through these methods, the honeypot continues to trap spambots without raising suspicion.
Key Takeaways:
- Creating a CSS class to obscure the honeypot from users is the first step to implementing this strategy;
- The honeypot field itself should be named in a way that appears legitimate to spambots;
- Spambots are continuously evolving. To combat them effectively, honeypots need to be dynamic and unpredictable;
- The implementation of a dynamic honeypot that changes its name and location for each request significantly enhances form protection;
- Ultimately, an effective honeypot serves to protect the integrity of your PHP contact form without compromising the user experience.
Crafting an Engaging PHP Contact Form: A Step-by-Step Guide
Building the Header and Footer of Your Form
Your founding blocks are the header and footer files. Included in the header.php file are essential elements to initiate the Contact Form:
<!DOCTYPE html>

<html lang="en">

<head>

  <meta charset="UTF-8">

  <meta name="viewport" content="width=device-width, initial-scale=1.0">

  <link rel="stylesheet" href="css/style.css">

  <title>Engage with Us</title>

</head>

<body>

  <main>
This segment sets up the HTML document, aligns meta attributes, applies the visually defining style.css stylesheet and initiates the title of the form.
As an extension of the header, the footer.php file seals the document with closing tags:
</main>

</body>

</html>
Bringing Your Contact Form to Life
The get.php file is the soul of the Contact Form – the visual presentation the visitor interacts with:
<?php if (isset($message)) : ?>

  <div class="alert alert-success">

    <?= $message ?>

  </div>

<?php endif ?>

<form action="index.php" method="post">

  <header>

    <h1>Connect with Us</h1>

  </header>

  <div>

    <label for="name">Name:</label>

    <input type="text" id="name" name="name" placeholder="Your name">

    <small><?= $errors['name'] ?? '' ?></small>

  </div>

  <div>

    <label for="email">Email:</label>

    <input type="email" id="email" name="email" placeholder="Your email">

    <small><?= $errors['email'] ?? '' ?></small>

  </div>

  <div>

    <label for="subject">Subject:</label>

    <input type="text" id="subject" name="subject" placeholder="Subject">

    <small><?= $errors['subject'] ?? '' ?></small>

  </div>

  <div>

    <label for="message">Message:</label>

    <textarea id="message" name="message" rows="5" placeholder="Your message"></textarea>

    <small><?= $errors['message'] ?? '' ?></small>

  </div>

  <button type="submit">Submit</button>

</form>
This snippet of code generates the interactive form complete with name, email, subject and message fields, in addition to the ‘Submit’ button. An essential feature here is the isset($message) function, which confirms the user’s message submission.
Remember:
- The header and footer files are crucial for initiating and concluding your form HTML document;
- The get.php file is where your form comes to life;
- Assuring your user of a successful submission improves user experience;
- Cleverly tucked away within the form is the clever honeypot, waiting to trap unsuspecting spambots.
Understanding the Core Operations of Your PHP Contact Form
Displaying Success Messages and Validating User Input
Your PHP contact form will first display a success message if it has been set:
<?php if (isset($message)) : ?>

    <div class="alert alert-success">

        <?= $message ?>

    </div>

<?php endif ?>
The form then loads the input fields with data from the $inputs array and generates error messages from the $errors array if any field data is invalid. This step ensures that users are alerted when they provide incorrect information and helps maintain form data integrity.
Implementing a honeypot into the form enhances security:
<label for="nickname" aria-hidden="true" class="user-cannot-see"> Nickname

    <input type="text" name="nickname" id="nickname" class="user-cannot-see" tabindex="-1" autocomplete="off">

</label>
Handling Form Submissions
The post.php file manages the form submission, ensuring all user inputs are filtered and validated. If any spam-like activity is detected, such as an entry in the honeypot field, it immediately blocks the form submission:
// Honeypot check

$honeypot = filter_input(INPUT_POST, 'nickname', FILTER_SANITIZE_STRING);

if ($honeypot) {

    header($_SERVER['SERVER_PROTOCOL'] . ' 405 Method Not Allowed');

    exit;

}

// Name validation

$name = filter_input(INPUT_POST, 'name', FILTER_SANITIZE_STRING);

$inputs['name'] = $name;

if (!$name || trim($name) === '') {

    $errors['name'] = 'Please enter your name';

}

// Email validation

$email = filter_input(INPUT_POST, 'email', FILTER_SANITIZE_EMAIL);

$inputs['email'] = $email;

if ($email) {

    $email = filter_var($email, FILTER_SANITIZE_EMAIL);

    if (!$email) {

        $errors['email'] = 'Please enter a valid email';

    }

} else {

    $errors['email'] = 'Please enter an email';

}

// Subject validation

$subject = filter_input(INPUT_POST, 'subject', FILTER_SANITIZE_STRING);

$inputs['subject'] = $subject;

if (!$subject || trim($subject) === '') {

    $errors['subject'] = 'Please enter the subject';

}

// Message validation

$message = filter_input(INPUT_POST, 'message', FILTER_SANITIZE_STRING);

$inputs['message'] = $message;

if (!$message || trim($message) === '') {

    $errors['message'] = 'Please enter the message';

}
This step ensures that the user input data is both valid and secure, filtering out any malicious or undesired content.
Key takeaways:
- Always alert users of successful form submissions for enhanced user experience;
- Data validation is crucial to guarantee the integrity of user-submitted data;
- Implement honeypots for added form security against spam-like activities;
- Filtering and validating user inputs helps in maintaining the security and functionality of the form.
Enhancing Web Contact Forms with PHP: A Comprehensive Guide
1. Advanced Handling of Web Contact Forms Using PHP
In modern web development, crafting a robust and secure contact form is crucial for ensuring effective communication and spam prevention. PHP, a widely-used server-side scripting language, offers powerful tools for this purpose. The process begins with the post.php script, which plays a pivotal role in managing the data submitted through the contact form.
- Spambot Prevention: The post.php script incorporates a honeypot technique, a clever method to deter automated spam bots. When a spambot is detected, the script responds with a 405 HTTP status code, effectively blocking malicious attempts;
- Data Sanitization and Validation: Beyond spam prevention, post.php ensures data integrity by meticulously sanitizing and validating user inputs. This includes critical fields such as the user’s name, email, subject, and message. This process is essential for protecting against common web threats like SQL injection and cross-site scripting (XSS).
2. Efficient Configuration Management in PHP
Centralizing configuration settings is a best practice in PHP development. The config.php file is instrumental in this regard, particularly for contact forms.
Storing Receiver’s Email: This file securely stores crucial configuration data, such as the email address of the form’s recipient. For instance, it might contain:
return [ 'mail' => [ 'to_email' => '[email protected]' ] ];Benefits: Centralizing such information simplifies maintenance and updates. Instead of hardcoding values in multiple scripts, developers can modify the config.php file, and the changes will propagate throughout the application.
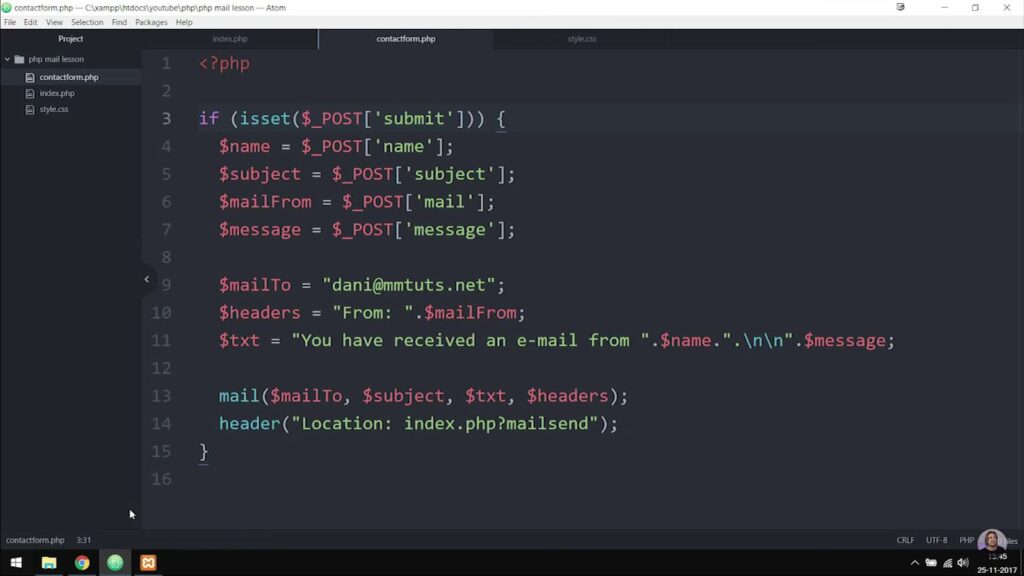
3. Streamlining Email Processing with mail.php
The mail.php script is a vital component that interfaces with the config.php file to fetch the recipient’s email address and handle the sending of emails.
Fetching Configuration and Contact Details: It retrieves the receiver’s email from the config.php and gathers user-submitted data (name, email, subject, message) from the contact form.
Crafting the Email:
- Email Headers: It constructs email headers, including MIME version, content type, and sender information, ensuring the email is correctly formatted and appears professional;
- Sending the Email: Utilizing PHP’s mail() function, mail.php sends the user’s message to the specified recipient.
Example:
$headers[] = 'MIME-Version: 1.0';

$headers[] = 'Content-type: text/html; charset=utf-8';

$headers[] = "To: $recipient_email";

$headers[] = "From: $contact_email";

$header = implode('\r\n', $headers);

mail($recipient_email, $subject, $message, $header);
Understanding the index.php File in PHP: A Comprehensive Guide
The index.php file serves as the central hub of logic for your PHP application. Let’s delve into its inner workings and explore how it manages sessions, handles HTTP requests, and ensures a seamless user experience.
1. Initiating Sessions for User Interaction
- The session_start() function kicks off user sessions, allowing for data persistence across multiple page visits;
- By using sessions, you can store and retrieve crucial information between different parts of your web application.
2. Handling GET Requests: Displaying Messages and Forms
When the HTTP request method is a GET, the index.php file takes specific actions:
- It checks if a message is stored in the $_SESSION array. If so, it retrieves and displays it;
- Alternatively, if there are errors and input data stored, it retrieves and displays these as well;
- To maintain a clean code structure, it includes the form display logic from an external file, get.php.
Tips for GET Requests:
- Use GET requests for retrieving information from the server, such as displaying data and forms;
- Leverage sessions to maintain user data and feedback across different interactions.
3. Handling POST Requests: Validating and Sending Emails
- When the HTTP request method is POST, the index.php file ensures the following;
- It checks for the honeypot (a method to prevent spam submissions) and validates form fields;
- If no validation errors are present, it proceeds to send an email using the mail.php file;
- To follow the Post-Redirect-Get (PRG) pattern and prevent double submissions, it redirects back to the contact form.
Tips for POST Requests:
- Use POST requests for sending data to the server, such as form submissions;
- Implement honeypots and form validation to enhance security;
- Employ the PRG technique to enhance user experience and prevent unintended form submissions.
4. Session Management: Preserving User Data
- Throughout this process, the $_SESSION array is vital for storing and retrieving data like messages, errors, and inputs;
- Session management ensures that user interactions are seamless and that feedback persists across different stages of interaction.
In Summary:
- The index.php file acts as the control center for your PHP web application;
- It handles both GET and POST requests, displaying forms, processing data, and maintaining user sessions;
- Proper session management and adherence to best practices like PRG contribute to a smooth user experience.
Also, dive into the world of PHP inclusion and supercharge your web development skills with our comprehensive guide on PHP include. Explore its secrets today!
Conclusion
In conclusion, this tutorial has equipped you with the knowledge and skills to create a robust PHP-powered contact form with a range of essential components, including thorough form validation, seamless email transmission, and an effective honeypot safeguard. By mastering these techniques, you are well-prepared to develop secure and functional contact forms for your web projects.