This detailed tutorial offers an in-depth approach to constructing a PHP registration form from scratch. It is aimed at both beginners and intermediate developers interested in enhancing their web development skills, particularly in PHP and database management.
Introduction to Crafting a PHP Registration Form
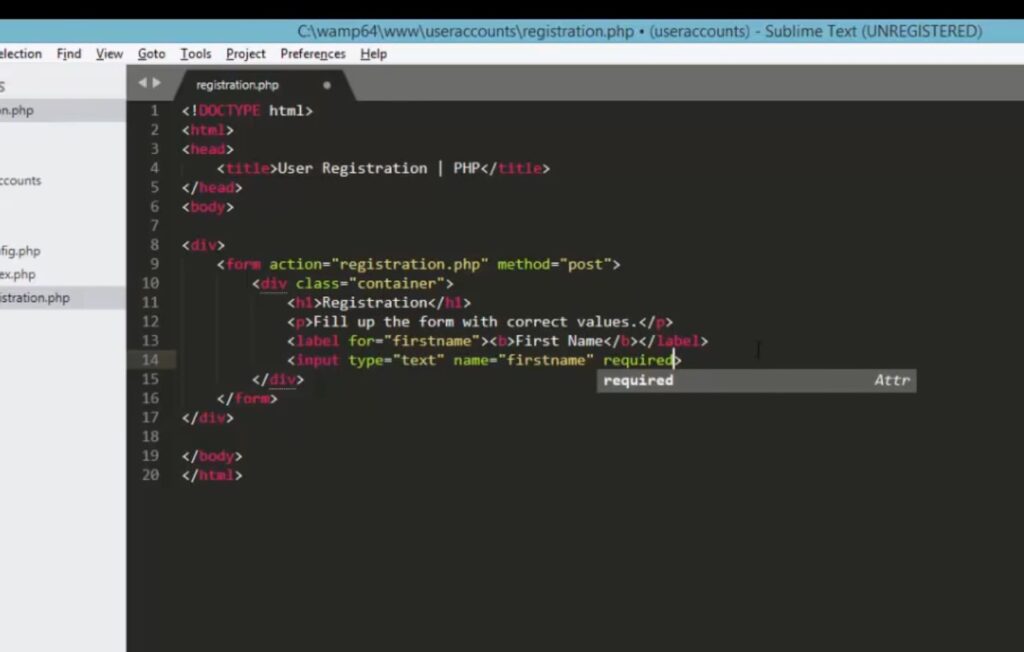
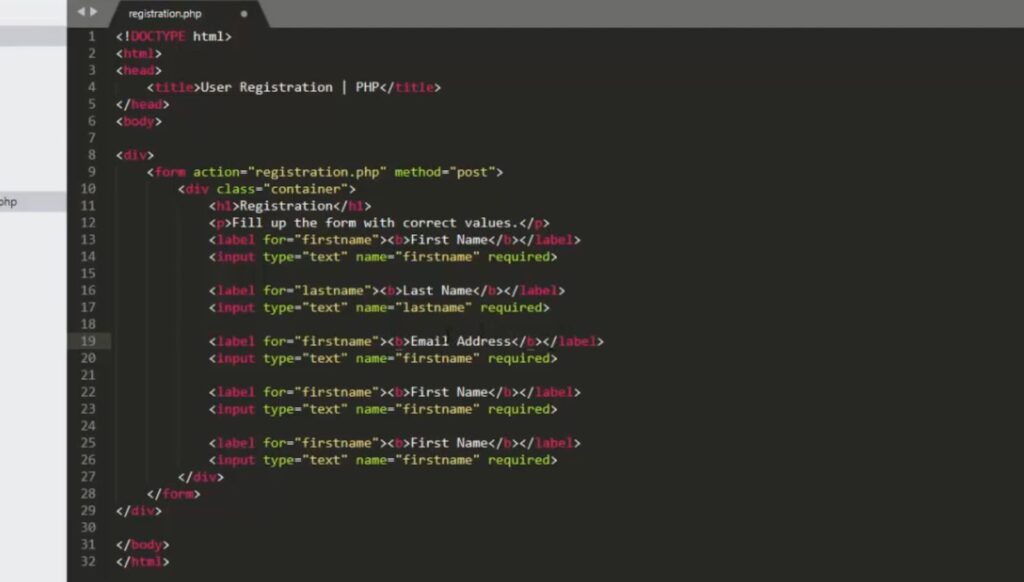
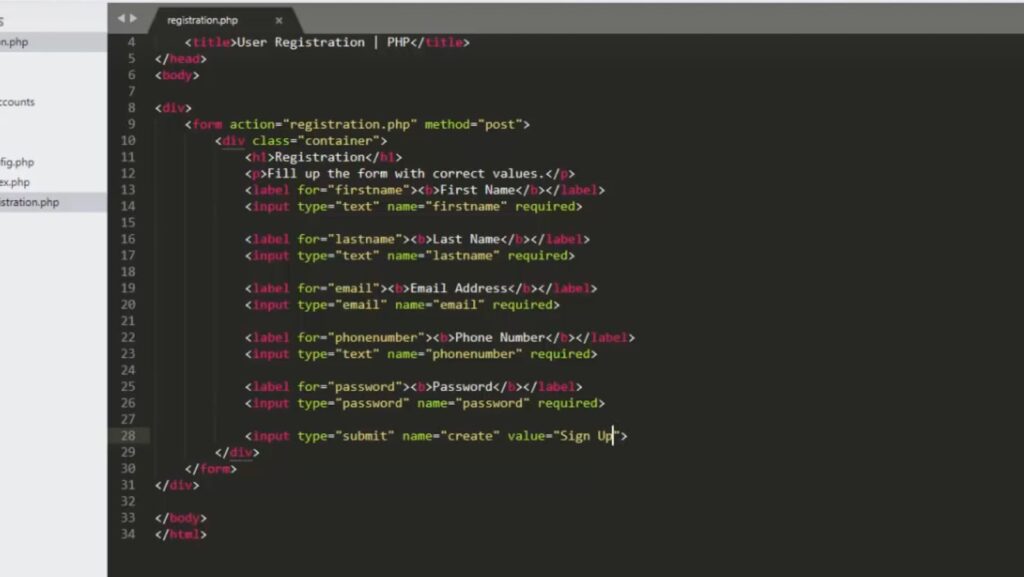
In this tutorial, the learner is embarked on a journey to create a user-friendly and functional PHP registration form. This form is a crucial component of many websites, allowing users to sign up and access personalized features. The form designed in this tutorial includes essential fields such as Username, Email, Password, Password Confirmation, an Agreement Checkbox, and a Register Button. Each of these elements plays a vital role in gathering and verifying user information, ensuring a secure and efficient registration process.
Detailed Process of Form Handling
The tutorial meticulously explains the process that occurs when a user interacts with the form. Key steps include:
- Sanitization and Validation of Inputs: This is crucial for security and data integrity. The tutorial explains how to clean data to prevent SQL injection attacks and validate inputs to ensure they meet specified criteria;
- Error Handling: In case the data entered by the user is invalid, the form is re-displayed with the user’s inputs and corresponding error messages. This feedback loop is essential for user experience;
- Database Interaction: Upon successful validation, the user’s data is inserted into a ‘users’ database table. This section of the tutorial covers basic database operations, including connection, insertion, and security best practices like using prepared statements;
- Redirection and User Feedback: After successful registration, the user is redirected to a login page, and a flash message is set to confirm the successful creation of the account. This part also sets the stage for learning about session management in PHP.
Setting Up the Project Structure
A well-organized project structure is vital for maintainability and scalability of the code. The tutorial guides through the setup as follows:
- Creating the Main Directory: This is the root of the project, named ‘auth’ for this example. It serves as the container for all other directories and files.
- Sub-directory Structure:
- `config`: Stores configuration files, such as database connection settings, which are crucial for separating configuration from code;
- `public`: Contains publicly accessible files like HTML, CSS, and client-side JavaScript. This segregation enhances security by limiting public access to only necessary file;
- `src`: Holds the PHP source files. It’s divided into;
- `src/inc`: For commonly included files, like headers and footers, which promotes code reusability;
- `src/libs`: Stores library files, such as those used for input validation and data sanitization.
Streamlining the Access with URL Simplification
A user-friendly URL structure is important for easy navigation and improved user experience. The tutorial provides a step-by-step guide to achieving this using Apache’s URL Rewrite module:
- Creation of `register.php`: This file is placed in the ‘public’ folder and is the main entry point for user registration;
- Using `.htaccess` for URL Rewriting:
In the project root folder, a `.htaccess` file is created with directives instructing the Apache server to rewrite URLs, effectively removing the ‘/public/’ segment.
To address any potential errors and ensure smooth URL redirection, another `.htaccess` file is created in the ‘public’ folder.
- Testing and Troubleshooting: The tutorial emphasizes testing the rewritten URLs to ensure they work as expected and provides troubleshooting tips for common issues.
Expanding Skills: Beyond Registration
While the focus of this tutorial is on creating a registration form, it lays the groundwork for more advanced topics in web development. Learners are introduced to concepts like session management, security best practices, and database interactions.
Upon completing this tutorial, learners will not only have a fully functional PHP registration form but also a solid foundation in web development with PHP. They are encouraged to experiment with the code, perhaps by adding more fields to the form or integrating more complex validation rules. Additionally, the tutorial sets the stage for the next learning phase, which involves building a login form and managing user sessions, thereby completing the user authentication journey.
This comprehensive guide ensures that learners are equipped with the necessary skills to build secure, efficient, and user-friendly registration systems, marking a significant step in their journey as PHP developers.
Developing an Organized and Dynamic Registration Form in PHP
Introduction to Form Creation
In this tutorial, the learner embarks on a journey to develop a user registration form, a fundamental component of many web applications. The form is structured within the `register.php` file, laying the foundation for user interaction and data collection.
Structuring the Registration Form
The initial phase involves constructing the registration form’s interface. The `register.php` file is created, encompassing a comprehensive HTML structure. This structure includes:
- HTML Basics: The document begins with the standard `<!DOCTYPE html>` declaration, followed by the opening `<html lang=”en”>` tag, indicating the language of the document;
- Head Section: Within the `<head>`, essential meta tags are placed for character set (`UTF-8`) and viewport settings, crucial for responsive design. A link to an external CSS file (`style.css`) is included for aesthetic styling of the form;
- Body and Main Section: The body contains a `<main>` element, which encapsulates the registration form. This form is designed with user-friendly fields for inputting username, email, password, and confirming the password. It also includes a checkbox for users to agree to the terms of service and a submission button for registering;
- Footer Section: A notable feature in the form is the footer section, offering a link to a login page for already registered users.
By accessing the URL `http://localhost/auth/register.php`, users are presented with this intuitive registration form.
Refining the Form’s Structure
To enhance the form’s organization and facilitate code reusability, the tutorial introduces separating the HTML into different segments.
Creating Header and Footer Files
- Header File (`header.php`): Located in the `src/inc` folder, this file contains the initial part of the HTML code, including the `<!DOCTYPE html>` declaration, the `<head>` section, and the opening `<body>` tag. This modular approach allows for easy maintenance and updates across multiple pages;
- Footer File (`footer.php`): Similarly placed in the `src/inc` folder, this file consists of the closing tags of the main section, body, and HTML. It ensures a consistent closing structure for web pages.
Implementing Dynamic Content
The tutorial then focuses on making the web pages more dynamic, particularly in handling the page titles.
- Dynamic Title Management: A `helpers.php` file is introduced in the `src/libs` folder, containing a `view()` function. This function enables loading PHP files dynamically and passing data using associative arrays. The concept of variable variables is utilized here, allowing the keys of the array to be used as variable names within the included files;
- Usage of the View Function: An example is provided, demonstrating the use of the `view()` function to load the `header.php` file and dynamically set the page title. This flexibility allows each page to have a specific title, enhancing user experience and SEO;
- Updating the Header File: The `header.php` file is updated to accept a variable for the title, defaulting to ‘Home’ if no specific title is provided. This ensures that every page using this header will have an appropriate title tag.
Centralizing File Inclusion
- Creating a Bootstrap File: The tutorial introduces a `bootstrap.php` file located in the `src` folder. This file is responsible for including the `helpers.php` file, centralizing the inclusion of commonly used functions and facilitating code management;
- Updating `register.php`: The `register.php` file is modified to include the `bootstrap.php` file, ensuring that all necessary functionalities are loaded. It uses the `view()` function to include the header and footer, with the title set as ‘Register’.
This tutorial provides a detailed guide on creating a well-organized, dynamic, and user-friendly registration form in PHP. The learner is introduced to essential web development concepts, including HTML structure, PHP file inclusion, dynamic content handling, and code modularization.
By the end of this tutorial, learners acquire not only the skills to build an effective registration form but also the understanding of best practices in PHP development. The knowledge gained here sets a solid foundation for further exploration into more complex web development tasks, such as form validation, database integration, and user authentication, paving the way for becoming proficient PHP developers.
Handling Registration Form Submission
When a user submits the registration form, it is directed to `register.php` via the HTTP POST method. In `register.php`, the initial step is to verify if the request method is POST. This can be achieved by inserting the following code at the beginning of the file:
```php
if (strtoupper($_SERVER['REQUEST_METHOD']) === 'POST') {
    // Form processing logic goes here
}
```
To streamline this process across various pages, a dedicated function, `is_post_request()`, is suggested to be added in the `helpers.php` file. This function encapsulates the method check:
```php
function is_post_request(): bool {
    return strtoupper($_SERVER['REQUEST_METHOD']) === 'POST';
}
```
Similarly, to handle GET requests, the `is_get_request()` function can be defined, returning true if the current HTTP request is GET:
```php
function is_get_request(): bool {
    return strtoupper($_SERVER['REQUEST_METHOD']) === 'GET';
}
```
Then, in `register.php`, `is_post_request()` is utilized like this:
```php
<?php

require __DIR__ . '/../src/bootstrap.php';

if (is_post_request()) {
    // Further processing
}
```
Sanitization and Validation of User Inputs
For ensuring the security and validity of user inputs, the use of `sanitize()` and `validate()` functions, or alternatively, a `filter()` function is recommended. To implement these, the following steps are suggested:
- Create `sanitization.php`, `validation.php`, and `filter.php` in the `src/libs` folder;
- Add the necessary code to these files (details provided at the end of this tutorial);
- Include these files in `bootstrap.php`, which should appear as follows:
   ```php
   <?php

   session_start();
   require_once __DIR__ . '/libs/helpers.php';
   require_once __DIR__ . '/libs/sanitization.php';
   require_once __DIR__ . '/libs/validation.php';
   require_once __DIR__ . '/libs/filter.php';
   ```

For using the `filter()` function to sanitize and validate user inputs, consider the following example:

```php
$fields = [
    // Field rules here
];

$messages = [
    // Custom messages for validation
];

[$inputs, $errors] = filter($_POST, $fields, $messages);
```
The `filter()` function takes three arguments: `$_POST` array for user inputs, `$fields` for rules, and `$messages` for custom validation messages.
If the form is invalid, redirect the user back to `register.php` using the post-redirect-get (PRG) technique and store `$inputs` and `$errors` in `$_SESSION`. For valid forms, create a user account and redirect to `login.php`, using session-based flash messages to communicate success.
Flash Message Management
Flash messages are managed using the `flash()` function. Steps for setting up include:
- Creating `flash.php` in `src/libs`;
- Adding necessary code to `flash.php`;
- Including `flash.php` in `bootstrap.php`.
To create a flash message in `register.php`, use:
```php
flash('user_register_success', 'Account creation successful. Please login.', 'success');
```
To display flash messages, simply call `flash()` without arguments, typically in the `header.php` file.
Error Highlighting in Form Fields
For highlighting errors in form fields, the `error_class()` function in `helpers.php` returns the ‘error’ class if `$errors` contains an error for a specific field:
```php
function error_class(array $errors, string $field): string {
    return isset($errors[$field]) ? 'error' : '';
}
```
Redirecting Users
Post successful registration, redirect users to the `login.php` page using `header()` and `exit`. The `redirect_to()` function in `helpers.php` encapsulates this:
```php
function redirect_to(string $url): void {
    header('Location: ' . $url);
    exit;
}
```
For invalid form data, use `redirect_with()` to add `$inputs` and `$errors` to `$_SESSION` and redirect:
```php
function redirect_with(string $url, array $items): void {
    foreach ($items as $key => $value) {
        $_SESSION[$key] = $value;
    }
    redirect_to($url);
}
```
Additionally, to set a flash message and redirect, the `redirect_with_message()` function can be defined:
```php
function redirect_with_message(string $url, string $message, string $type = FLASH_SUCCESS) {
    flash('flash_' . uniqid(), $message, $type);
    redirect_to($url);
}
```
This approach ensures a cohesive and secure user registration process, incorporating best practices in form handling, data sanitization, validation, and user redirection.
Comprehensive Guide to Implementing Flash Session Data in PHP
In the realm of web development, especially with PHP, managing session data is a vital aspect of creating a dynamic and user-friendly experience. Particularly in scenarios like user registration, where preserving temporary data across requests is crucial, session management plays a key role. This guide delves into implementing an efficient session data management system, focusing on the `session_flash()` function, updating the `bootstrap.php` file, structuring the `register.php` file, and integrating a user database.
Understanding Session Management in PHP
Sessions in PHP are a way to store data on the server-side to be accessed across various pages by a user during their visit to a site. When a session starts, a unique ID is generated, typically stored in a cookie on the user’s browser. This ID links the user to their session data stored on the server.
Implementing the `session_flash()` Function
The `session_flash()` function is a powerful tool for flash session data management. Its primary purpose is to retrieve and then immediately remove data from the `$_SESSION` global array. This is particularly useful in scenarios like form submission feedback, where you display an error or success message once and then clear it from the session.
How `session_flash()` Works
The function is designed to accept a variable number of arguments, making it a variadic function. For each key provided, it checks if that key exists in the `$_SESSION` array. If it does, the function adds the value of that key to a return array and then unsets the key in the session. If the key is not found, an empty array is returned for that key.
The Role of `bootstrap.php` File in Session Management
The `bootstrap.php` file acts as an initializer for PHP web applications. It typically contains code that needs to run at the beginning of every page load.
Essential Components of `bootstrap.php`
- Session Initialization: It’s crucial to start the session at the beginning of your PHP application. The `session_start()` function is used to start a new session or resume an existing one;
- File Inclusions: This file is also responsible for including other PHP files necessary for the application, like helper functions, flash message management, input sanitization, and validation.
Structure and Functionality of the `register.php` File
The `register.php` file is central to the user registration process, handling both the logic and presentation of the registration form.
Handling POST Requests
When the `register.php` file receives a POST request, typically after a form submission, it processes the user registration. This involves:
- Validating input fields using custom rules and messages;
- Using the `filter()` function to sanitize and validate inputs;
- Handling errors and redirecting back to the registration form if necessary;
- Registering the user using the `register_user()` function if there are no errors;
- Redirecting to the login page with a success message upon successful registration.
Handling GET Requests
For GET requests, the primary task of `register.php` is to retrieve and display any flash session data, such as errors or previously entered input values, using the `session_flash()` function.
Decoupling Logic and Presentation
To maintain a clean and maintainable codebase, it’s beneficial to separate the logic (backend processing) from the presentation (frontend display). This can be achieved by:
- Placing the form processing logic in a separate PHP file within the `src` folder;
- Keeping the HTML form and view-related code in a file in the `public` folder.
Setting Up the User Database
For the `register_user()` function to work, a user database is required. The database typically contains a `users` table with columns for storing user details such as username, email, and password.
Steps for Database Setup
- Creating the Database: Use a database management system like MySQL to create a new database;
- Designing the `users` Table: The table should include fields for user information and security features like hashed passwords;
- Establishing a Database Connection: In your PHP application, establish a connection to this database using PDO or MySQLi.
Developing the `register_user()` Function
The `register_user()` function is responsible for inserting new user data into the `users` table.
Functionality of `register_user()`
- It takes user input data, like email, username, and password;
- Validates the data against existing records to avoid duplicates;
- Hashes the password for security purposes;
- Inserts the new user record into the database;
- Returns a success or error status based on the operation’s outcome.
Implementing Flash Messages
Flash messages are temporary messages displayed to the user, often used to show success or error notifications post form submission.
Creating Flash Messages
- Use the `flash()` function to set a flash message in the session;
- On the subsequent page load, retrieve and display this message;
- Immediately unset the message from the session to ensure it’s shown only once.
Error Handling and User Feedback
Providing immediate feedback to users during registration is crucial. This involves:
- Highlighting erroneous form fields;
- Displaying error messages relevant to each field;
- Offering success messages upon successful operations.
Implementing Error Highlights
- Use an `error_class()` function to add a CSS class to input fields that have associated errors;
- Display inline error messages to guide users on how to correct their inputs.
Implementing an efficient session data management system in PHP enhances the user experience by providing seamless data transfer across pages and immediate feedback. It’s important to:
- Keep your session management secure and concise;
- Separate logic from presentation for better maintainability;
- Ensure database interactions are secure and efficient;
- Provide clear and helpful user feedback throughout the registration process.
By following these guidelines, developers can create a more robust and user-friendly registration system in their PHP applications.
Establishing a User Database and Table in MySQL
In the process of developing a user management system, the primary step involves setting up a database using MySQL, a popular database management system. MySQL is accessible through various client tools like phpMyAdmin or command-line interfaces.
Creating the Database
The first action is to establish a new database, named `auth`, on the MySQL server. This is done using the following SQL command:
```sql
CREATE DATABASE auth;
```
Structuring the Users Table
Subsequently, a table called `users` is created within the `auth` database. This table is structured to store essential user information. The SQL command for creating this table is as follows:
```sql
CREATE TABLE users (
    id INT AUTO_INCREMENT PRIMARY KEY,
    username VARCHAR(25) NOT NULL UNIQUE,
    email VARCHAR(320) NOT NULL UNIQUE,
    password VARCHAR(256) NOT NULL,
    is_admin TINYINT(1) NOT NULL DEFAULT 0,
    created_at TIMESTAMP DEFAULT CURRENT_TIMESTAMP,
    updated_at DATETIME DEFAULT CURRENT_TIMESTAMP ON UPDATE CURRENT_TIMESTAMP
);
```
Description of Table Columns
- id: Serves as the primary key. It’s an auto-increment field, meaning MySQL automatically increments its value for each new entry;
- username: A unique string field that does not allow null values, ensuring each user has a distinct username;
- email: Similar to `username`, this field is also unique and non-nullable;
- password: A string field to store the user’s password;
- is_admin: A tiny integer indicating whether a user is an admin (`1`) or not (`0`);
- created_at: A timestamp that MySQL automatically sets to the current timestamp upon the creation of a new record;
- updated_at: A datetime field that MySQL updates whenever an existing row is modified.
Connecting to the MySQL Database
To facilitate interaction with the MySQL database, PHP’s Data Object (PDO) library is employed.
Setting up Database Parameters
The first step involves creating a `database.php` file in the config folder, where database parameters like host, database name, user, and password are defined:
```php
<?php

const DB_HOST = 'localhost';
const DB_NAME = 'auth';
const DB_USER = 'root';
const DB_PASSWORD = '';
```
Establishing the Connection
Next, a `connection.php` file is created in the `src/libs` folder. Within this file, the `db()` function is defined. This function is responsible for establishing and returning a PDO connection object. It utilizes the database configurations set in `database.php`.
```php
function db(): PDO {
    static $pdo;

    if (!$pdo) {
        $pdo = new PDO(
            sprintf("mysql:host=%s;dbname=%s;charset=UTF8", DB_HOST, DB_NAME),
            DB_USER,
            DB_PASSWORD,
            [PDO::ATTR_ERRMODE => PDO::ERRMODE_EXCEPTION]
        );
    }
    return $pdo;
}
```
In this function, `$pdo` is a static variable. On the first invocation of `db()`, `$pdo` is uninitialized, triggering the creation of a new PDO object connected to the database. For subsequent calls, the existing PDO object is returned, avoiding repeated connections to the database. This approach optimizes resource usage as establishing a database connection is resource-intensive.
Key Considerations
- Efficiency: It’s crucial to connect to the database only once per request to save time and resources;
- Security: When handling user data, particularly passwords, security practices like hashing should be implemented;
- Scalability: The database and table structure should be designed to accommodate growing user data and evolving application requirements.
By meticulously setting up and connecting to a user database, developers lay a solid foundation for secure and efficient user management in their applications.
Detailed Overview of the User Registration Process
In the realm of web development, user registration is a critical component, especially for applications requiring user authentication and data management. This document delves into the specifics of implementing a user registration system, highlighting the `register_user()` function within a PHP-based project. The process is detailed, ensuring a secure and efficient way of handling user data.
Setting Up the Environment
Creating the Authentication File
The first step in the process involves establishing the foundation for user registration. This is achieved by creating an `auth.php` file, which resides in the `src` folder of the project. This file acts as the cornerstone for handling user-related operations, particularly registration.
Function Definition and Purpose
The `register_user()` function plays a pivotal role in adding new users to the system. It is defined to take four parameters: email, username, password, and an optional is_admin flag which defaults to false. The primary purpose of this function is to insert a new user’s details into the `users` table of the database.
```php
function register_user(string $email, string $username, string $password, bool $is_admin = false): bool {
    // SQL insertion statement
    // ...
}
```
SQL Statement and PDO
The function begins by preparing an SQL statement for inserting data into the database. This statement is carefully prepared using PDO (PHP Data Objects), a robust and secure method of interacting with databases in PHP. PDO provides methods to prevent SQL injection, a common security vulnerability.
Binding Parameters
The next step involves binding the provided parameters to the prepared SQL statement. This is crucial for ensuring that the data inserted into the database is exactly what is intended, without any alterations or injections. The password is hashed using the `password_hash()` function for security.
Execution and Return
Finally, the function executes the prepared statement. If the execution is successful, the function returns true, indicating that a new user has been successfully added to the database.
Emphasizing Password Security
- The Imperative of Hashing Passwords. In the modern web, storing passwords in plain text is a significant security risk. To mitigate this, the `register_user()` function incorporates password hashing. The password is hashed using PHP’s `password_hash()` function, which employs the BCRYPT algorithm, recognized for its security;
- Benefits of BCRYPT. Using BCRYPT for hashing provides a high level of security due to its computational intensity, making it resistant to brute-force attacks. Additionally, it automatically handles salt creation, further enhancing security.
Project Structure and Components
- Overview of Directory Structure. The project is structured in a way that promotes organization and modularity. The main directories include `config`, `public`, and `src`, each serving a specific purpose;
- Configuration Files. The `config` directory contains configuration files, notably `database.php`, which holds the database connection settings;
- Public Access and User Interface. The `public` directory includes files that are directly accessible to users, such as `register.php`, which provides the user interface for registration;
- Source Code and Libraries. The `src` directory is the heart of the application, housing the `auth.php` file and various libraries for functionalities like database connection, input sanitization, validation, and helper functions.
Implementing the Registration Page
- User Interface and Form Handling. The `public/register.php` file presents the registration form to the user. This form includes fields for username, email, password, and an agreement checkbox. It utilizes the `error_class()` function from the helper library to display any validation errors next to the respective input fields;
- Session-Based Flash Messaging. Flash messaging, handled by `src/libs/flash.php`, is an elegant way of displaying one-time notifications, such as success or error messages, to the user. This system stores messages in session variables and displays them on the next page load before clearing them.
Processing Registration Data
- Form Data Handling in `src/register.php`. The `register.php` file in the `src` directory is responsible for processing the registration form data. It defines validation rules for each input field using the `validate()` function from the validation library;
- Custom Error Messages. Custom error messages are defined for each validation rule, providing clear and user-friendly feedback. These messages are displayed next to the respective input fields on the registration form in case of validation failures;
- Filtering and Sanitizing Inputs. Input sanitization is handled by the `sanitize()` function, ensuring that the data entered by users is safe and clean before being processed or stored in the database;
- Successful Registration Flow. On successful validation of user inputs, the `register_user()` function is called to insert the new user into the database. If this insertion is successful, the user is redirected to a login page with a success message, indicating that their account has been created;
- Handling Errors and Redirects. If any errors occur during the registration process, be it validation failures or issues in database insertion, the user is redirected back to the registration page with appropriate error messages displayed.
Security and Best Practices
- Emphasizing Secure Data Handling. Security is a top priority in the development of the registration system. Password hashing, SQL injection prevention using PDO, and input sanitization are just a few of the measures taken to ensure data security;
- Continuous Improvement and Updates. The project is designed for scalability and easy updates. By structuring the code in a modular fashion and following best practices, future enhancements and maintenance become more manageable.
Conclusion
In summary, the development of the `register_user()` function within a PHP-based project involves careful planning and implementation, focusing on user-friendliness, security, and efficiency. The structured approach, from setting up the authentication file to processing form data and implementing security measures, demonstrates a comprehensive understanding of web development principles and best practices. This system not only adds users to a database but does so in a way that is secure, efficient, and scalable, ensuring a robust foundation for any web application requiring user registration.